Hello and welcome to the first of my Rise of Flight Mission Editor tutorials.
I’m hoping this tutorial will provide an easy introduction in to using the RoF Mission Editor (ME). I’ll be walking you through how to getting the RoF ME up and running and show you how to build your first Single Player Mission in a few easy steps.
So let begin.
I’m hoping this tutorial will provide an easy introduction in to using the RoF Mission Editor (ME). I’ll be walking you through how to getting the RoF ME up and running and show you how to build your first Single Player Mission in a few easy steps.
So let begin.
Step one - Find and run the Mission Editor
The Mission Editor program file is located in:
\777\Rise of Flight\bin_editor\release\ROFEditor.exe
 |
| Click to embiggen |
As you can see the ME is a separate program to the main RoF game but it uses the same resources and is updated to the latest version at the same time as your RoF game. Bear in mind that you can’t run the ME at the same time as RoF so before you can test the missions you are working on you will need to close ME and open RoF.
Run ROFEditor.exe and you should see the splash screen loading. Because the ME automatically loads the last mission that you were working on two dialogue boxes will pop up one after the other telling you that the mission being loading is valid. Click OK to get rid of them.

You should then be presented with the ME interface.

Important: If the main 3d view port is blocky and pixelated then you can fix it by minimizing the ME then maximize it using the standard Windows buttons in the top right.
 |
| Blocky viewport bug |
Step two - Loading the Lake map and buildings
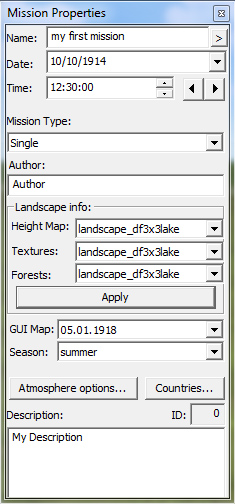
You will see a floating dialogue box called Mission Properties.
If you can’t see the properties box then you can right click in the viewport and select Properties to reopen it.
 |
| right click menu |
Next we'll change the map from the Western Front "landscape" summer map to the Lakes dogfight map "landscape_df3x3lake". You need to do this for all three slots (Height Map, Textures & Forests) in Landscape info in Mission Properties.

Click Apply and the new map will load. OK the two dialogue boxes.

Now we have the new map loaded let's have a quick look around. Click the toggle Camera button on the toolbar to change the view in the 3D viewport so that we're looking down on the map.

Right click hold and drag the mouse to pan the map and use the mouse wheel to zoom. Have a look around the map and you'll notice that there are no buildings. That's the next task.

Go to File in the menu bar and select Import From File.

The buildings for the lake map are stored in:
\777\Rise of Flight\data\release\Template\Base_DF3x3Lake.Group
Select the Group and click the Open button.


Now you should see the gray Building Object icons on the map. Pan and zoom to find the airfield icon on the south side of the large lake in the centre of the map. This will be your home airfield for the mission.

Toggle the TXT button on the toolbar to show the name of the airfield, in this case Campaubert.

Step three - Name and save your first mission
Start by naming your mission and saving it. If you don’t save it now you will be forced to soon so you might as well get it out of the way.
At the top of the Mission properties box in the Name field you will see the mission is called MyMission. Change this to my first mission or whatever you like.
Now go up to File in the menu bar and choose Save As.


Step four - Adding your aircraft
Now that you have an airfield you'll need a plane to fly. On the right hand panel of the ME is the Objects Library containing all the objects and controllers that you can add to your mission. Click on Planes and select the Spad 13 from the list in the panel below. Move your cursor over the map and you'll see that cursor is now a cross hair. Left click on the airfield to place your plane. The plane icon is highlighted and the Properties box has changed to show the Plane's properties.

In Plane Properties change the name of the SPAD to "Player Spad" and Click the Create Linked Entity button.
Note: By making the SPAD a Linked Entity you make it visible in game and allow it to link to the triggers and controllers that will tell it how to behave. Most objects need to be made Linked Entities to be visible and function in game except for buildings and static objects that are visible by default. Buildings and static object can be made Linked Entities if you want to trigger a behaviour involving them such as getting bombers to attack a specific building.

Now we will go into the SPAD's Advanced Properties. Click on the small button next to the name in Plane Properties and the Advanced Properties box will appear. In Advanced Properties we will change the AI: from "Normal" to "Player" making this the player controlled plane in the Single Mission. We will also change the nationality from neutral to French. As you can see the colour of the Plane icon will change to Blue. We will leave the Enable box checked, if you uncheck this the Plane won't be in Game until it is given an Activate command. With it checked the SPAD starts the game already active. Leave Start in air unchecked because we want to start the SPAD on the ground at the airfield.

In the Plane properties you can see the SPAD's location and it orientation. Let's move it over to the south west side of the airfield and make it face the lake. Left click on the SPAD and drag it into place. zoom in a little and click the little red box on the bottom left of the green selection box surrounding the SPAD and drag to rotate. Make it point approximately 20 degrees north east. One thing to be aware of is the X coordinate or the height of the plane. When you first create the plane it will be at ground level but as you move it it wil stay at the same height so if the ground slopes away it may end up floating in the air. On the toolbar there is a button that puts the selected object back at ground level.

Now save your mission and close the ME, it's time to test the mission in RoF.
That's all for now. In the next part I will show you how create waypoints for your aircraft and an AI opponent.
No comments:
Post a Comment